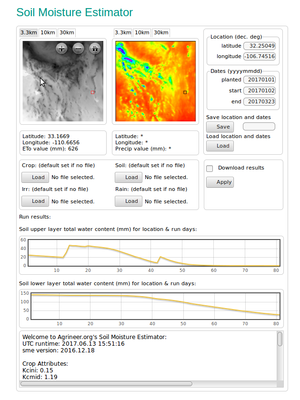
Soil Moisture Estimator
Description, Disclaimer
Contents
- 1 Procedure
- 2 Program ETo
- 3 Soil Moisture Estimator Tool
- 4 Soil and Crop Forms
- 5 WxPython (local) Version
- 6 How to Replicate
- 7 Download
- 8 User Support
- 9 Status
- 10 Procedure
- 11 SME application with numbered sections
- 11.1 Input section
- 11.2 Output section
- 11.2.1 6 images: ETo 3.3km, 10km, 30km; Precipitation 3.3km, 10km, 30km
- 11.2.2 Latitude, Longitude, ETo value; Latitude, Longitude, Precipitation value
- 11.2.3 Plot of soil UPPER layer water content for dates provided
- 11.2.4 Plot of soil LOWER layer water content for dates provided
- 11.2.5 Text report
Procedure
Program ETo
Description
FAO Implemention
WRF variables
How to run
Output Variables
Soil Moisture Estimator Tool
Description
Procedure
Input Form
Displays
Text Output
Soil and Crop Forms
Cookies blah blah
Soil Input
Crop Input
WxPython (local) Version
How to Replicate
Download
User Support
Status
To Do List
The Soil Moisture Estimator (SME) project is based on the WRF Hindcast project and ... .......... ...... ... ........ .......
Procedure
.............. ...... ............................... .............. . .. ............. ............. .. ..... ........
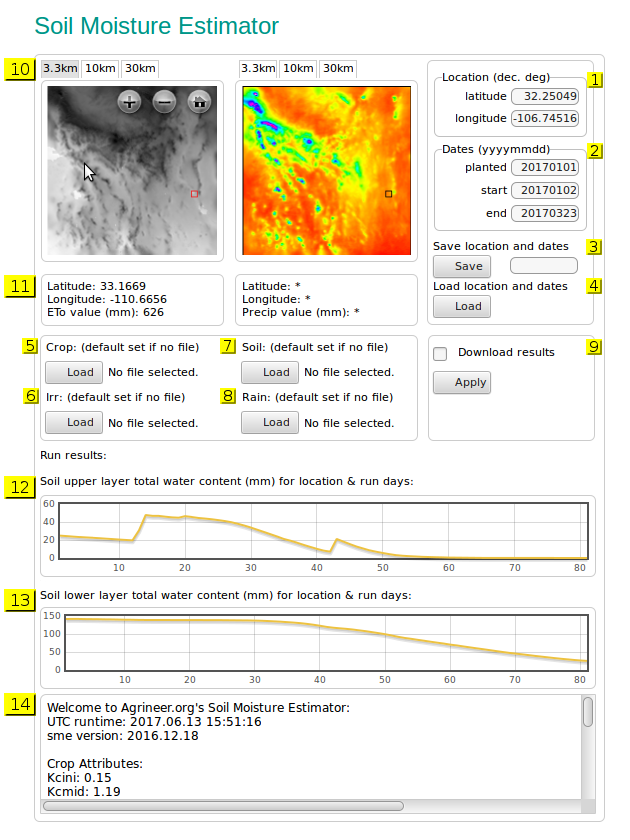
SME application with numbered sections
Input section
Location (decimal degrees)
(yellow #1 in the above image)
Note: currently about 1/3 of the geographical area of the contiguous 48 states is available for processing. See WRF Hindcast for current operational sectors. If the provided latitude and longitude values are not within the active sectors an error message will appear stating 'Cannot find given location in active sectors'.
The latitude and longitude values of the area of interest, in decimal form. Example: 32.25049, -106.74516
latitude 32.25049
longitude -106.74516
Dates (yyyymmdd)
(yellow #2 in the above image)
    planted: date crop planted

    start: run application from this start date

    end: run application to this end date
Save location and dates
(yellow #3 in the above image)
If you wish to save the shown Location & Dates values to a file (to quickly load at a later time) enter a file name for the file (ex: xxxxxxx) and then click 'Save'. Follow your computer's directions to save the file. You may create and save as many files as you like.
Load location and dates
(yellow #4 in the above image)
To load a previously created and saved Location and Dates file click 'Load', find and open the file you want to use.
Crop
(yellow #5 in the above image)
For more precise results or experimentation you may create and save your own 'Crop' files (click on the 'crop cultivars' link in the lower right of the SME application page). You may create as many as you like. To use one of your own 'Crop' files click the 'Load' button and open the file of interest. The name of the file you chose will be listed to the right of the 'Load' button.
If you choose not to use your own 'Crop' file a default file will be used. Here are the variables and values for the default 'Crop' file (which is a csv file with text headers):
Crop -> Bean; Kc ini -> 0.15; Kc mid -> 1.19; Kc End -> 0.35; Ln ini -> 25; Ln dev -> 25; Ln mid -> 30; Ln late -> 20; GDD Basetemp -> 5.1; GDD Uppertemp -> 30.5; Wilt Point -> 10.7;
Irrigation
(yellow #6 in the above image)
Soil
(yellow #7 in the above image)
Same as #5. To make and save your own 'Soil' files click on the 'soil types' link in the lower right of the SME application page.
The variables and values for the default 'Soil' file: soil -> soil_default; comment -> demo purposes; uztwm - 50.1; uzfwm -> 40.2; uzk -> 0.1; pctim -> 0.000001; adimp -> 0.0; zperc -> 1.0; rexp -> 0.0; lztwm -> 250.0; lzfsm -> 500.0; lzfpm -> 500.0; lzsk -> 0.01; lzpk -> 0.1; pfree -> 0.1; uztwc_0 -> 0.5; uzfwc_0 -> 0.5; lztwc_0 -> 0.5; lzfsc_0 -> 0.5; lzfpc_0 -> 0.5; adimc_0 -> 0.5;
Rain
(yellow #8 in the above image)
Apply
(yellow #9 in the above image)
Run the application with the provided input values.
'Download results' checkbox: activate this checkbox if you wish to receive a .zip file which contains files of data on your run and its results. In effect these are 'hardcopies' of a particular run of the application. For example, the 'sme.log' file is a text file which contains the same data as the 'Text report' (yellow #14).
Follow your computer's instructions to save the file. Write down the name of the file because it can be a real doozy to recall (ex: SME_59516e5551758.zip). After it is saved you will need to go where the file was downloaded and 'extract' the contents of the .zip file.
Output section
6 images: ETo 3.3km, 10km, 30km; Precipitation 3.3km, 10km, 30km
(yellow #10 in the above image)
There are 2 image display areas. The left one is for ETo (evapotranspiration) data, the right one for Precipitation data. Both have 3 tabs for a total of 6 available images. All 6 images are 171 x 171 pixels in size but the resolution of each pixel varies in each of the tabs.
3.3km each pixel in this image represents an area approximately 3.3 km by 3.3 km.
10km each pixel in this image represents an area approximately 10 km by 10 km.
30km each pixel in this image represents an area approximately 30 km by 30 km.
Clicking on the '+' in the image will 'zoom-in' the image.
Clicking on the '-' in the image will 'zoom-out' the image.
If your mouse has a wheel you can use it to zoom in and out.
Clicking and holding down the left button on the mouse enables moving the image.
Clicking on the 'house' in the image will restore the image to its initial display size and position.
In the ETo 3.3km image you should see a small blinking red square; in the Precipitation 3.3km image there is a small blinking black square. Your latitude and longitude of interest will be inside this square. Use the '+' sign or the wheel on your mouse to zoom in. Move the mouse around inside the square until the latitude and longitude values shown in #11 approximate the values you entered in #1 for latitude and longitude. It is unlikely they will match exactly, a very, very small disappointing aspect of the display software. Note that the 'Text report' (yellow #14) has the exact latitude and longitude.
If you don't see the small blinking red or black square it's because the underlying or surrounding area is the same or similar color. In this case move the mouse around in the image and look at the latitude and longitude values displayed in #11 until you have homed in on the desired area, then zoom in, etc.
Latitude, Longitude, ETo value; Latitude, Longitude, Precipitation value
(yellow #11 in the above image)
Each pixel of a displayed image (171 x 171 pixels = 29,241 total pixels per image) has values representing the pixel's latitude, longitude, and the calculated ETo or Precipitation values. Move your mouse over the image and watch #11 to see the results.
Plot of soil UPPER layer water content for dates provided
(yellow #12 in the above image)
Plot of soil LOWER layer water content for dates provided
(yellow #13 in the above image)
Text report
(yellow #14 in the above image)
Text description of the SME run and its results.

